How To Care For Your Blocks
Dirt, sand, and grime can accumulate in your blocks over time. To prevent this, the best sailors keep their gear clean and in tip-top shape. Let’s show you how.

Dirt, sand, and grime can accumulate in your blocks over time. To prevent this, the best sailors keep their gear clean and in tip-top shape. Let’s show you how.
Pro tips for cutting line properly, use them to prevent unwanted core and cover unraveling.
Peak inside the tool kit of professional rigger Kristian Martincic, to learn about the essential tools of the trade.
The Blockheads team visited Sarasota Youth Sailing‘s 32nd Annual SailFest regatta to spread the good word of rigging and repair self-reliance.
When should a line stretch, and when should it not? Join Kristian Martincic of Chicago Yacht Rigging to find out.
Learn about the job of a professional rigger, and how they turn rope into line using specialized tools and techniques.
Featuring Kristian Martincic of Chicago Yacht Rigging.
Not all rope is created equal. Learn about the different material types and methods used to construct the lines on your boat.
Featuring Kristian Martincic of Chicago Yacht Rigging.
Tucked away along the mountainous coast of British Columbia is the West Vancouver Yacht Club, host of the Pumpkin Bowl Regatta presented by Harken and Pro-Tech. A must-attend on the annual BC sailing circuit, the Pumpkin Bowl prioritizes a fun and festive environment for kids and adults alike, along with running a great on the water regatta. The 2018 edition attracted more than 200 competitors across five classes and was supported by a legion of adult volunteers.
For a full report on the 2018 Pumpkin Bowl, check out Kurt Hoehne’s article on sailfish.com, and check out photos in the gallery below.
Browse all photos on the West Vancouver Yacht Club Facebook page.
Photos: Jill Amery | West Vancouver Yacht Club
The Blockheads team visited Put-in-Bay, Ohio for the 63rd Junior Bay Week to see just what this famous regatta is all about.
The Dinghy Race is unlike any other youth sailing event. Throwing out the typical windward leeward playbook, the event aims to be an offshore adventure that presents juniors with new challenges and experiences. Setting out from Niantic Bay Yacht Club on Long Island Sound, a fleet of Club 420s raced several point-to-point legs over a distance of seven miles, eventually ending at Fishers Island. Once on the island, racing was followed by a debrief and kid-friendly regatta party, capped-off by a massive camp out in the island’s high school gymnasium. The next morning, once roused by the regatta organizers, the kids hopped back into their boats and raced back to the mainland. It was great to see the sailors applying the Blockheads tuning scale to their boats and using the tips in the accompanying tuning pamphlet. It’s our goal to return for the 2019 edition and hope everyone considers checking out and sending a team to this super fun, challenging, and unique event.
Over time, UV rays will gradually degrade the gel coat layer on your boat. Learn the fundamentals of the process for restoring the gel coat to its former glory so you are ready to fly at the next regatta.
Learn the fundamentals of filling-in and patching-up damage to your dinghy’s centerboard.
Finish the job in part two:
Learn how to treat wear-induced spider cracks that appear along the hull of your dinghy. If not managed, these small cosmetic annoyances can lead to bigger problems down the road.
Finish the job in part two:
NOTE: Always make sure you are accompanied by someone experienced in working with marine chemicals and power tools before attempting any of these projects.
Follow along and learn how to repair common types of damage to the gel coat layer on the hull of your dinghy. (Watch Part 2 below)
Gel coat is a thin protective layer that is applied on top of the fiber glass core of the hull. You can think of it this way: if the hull is the chocolate inside of an M&M, gel coat is the candy-colored shell. Keeping the gel coat layer intact is very important to the long-term health of any sailboat. If water is allowed to creep into the fiber glass core, it can soften the material and rapidly reduce the structural integrity of the boat.
Now, we of course understand that all sorts of things can happen to a dinghy throughout a typical day of sailing. Dropping the transom onto pavement is pretty much guaranteed to happen. It’s OK! It just means that learning how to repair gel coat can prove to be an essential skill and key to maximizing the lifespan of your boat.
Many club-owned boats feature rubber bow bumpers designed to minimize the consequences of just-too-close encounters that can occur while racing. Great as they are, these fiber-glass-saving tools can only take so much abuse before requiring their own attention. In this video, learn how to repair or replace the bow bumper on your 420 or a dinghy like it.
Carrying the right spare parts is essential for making quick fixes when you’re on the water. Learn what to bring along in your life jacket or dry bag that can help avoid day-ending breakages, featuring Taylor Martin, director of Pewaukee Lake Sailing School.
To prevent breakages aboard your boat, you need to know what to look for. In this series of in-depth walkthroughs of the Club 420, Laser, and Opti, learn what can go wrong and how to prevent it, featuring Taylor Martin, director of Pewaukee Lake Sailing School.
To prevent breakages aboard your boat, you need to know what to look for. In this series of in-depth walkthroughs of the Club 420, Laser, and Opti, learn what can go wrong and how to prevent it, featuring Taylor Martin, director of Pewaukee Lake Sailing School.
To prevent breakages aboard your boat, you need to know what to look for. In this series of in-depth walkthroughs of the Club 420, Laser, and Opti, learn what can go wrong and how to prevent it, featuring Taylor Martin, director of Pewaukee Lake Sailing School.
Learn how to apply the Harken Blockheads tuning decal on the Melges 14 to create repeatable settings next time you hit the water. Featuring John Pearce, US Sailing Youth Director.
Follow along as John Pearce, US Sailing Youth Director, applies the Harken Blockheads tuning decal on a Laser to create fast, repeatable settings.
Laser sailors know that active control line adjustment is crucial to fast sailing. As a result, it’s important to identify and address potential friction points in the control systems that can lead to reduced efficiency and performance. In this video, learn where these friction points are and why applying a dry lubricant such as McLube® Sailkote can be a lifesaver when you’re out on the race course.
Follow along as John Pearce, US Sailing Youth Director, applies the Harken Blockheads tuning decal on a Club 420 to create fast, repeatable settings.
You can use the photos below to supplement the video:
A. Tie a line to the jib tack pin.

B. Bring the line back through the fairlead and cleat-off as if it were a jib sheet. This will give you the theoretical tightest trim angle the jib would see.

C. On both sides of the boat, locate the point along your piece of line where the middle of the jib foot would be when trimmed. Place a strip of electrical tape on the deck, parallel and to the outside of the line. Using the tuning decal as a ruler, place it perpendicular to the tape so that the outside edge of the tape aligns with the number 1 mark on the decal. From here, place two more strips of electrical tape at the number 3 and number 5 marks, aligning the outside edges of each with the marks.

D. These three strips will help you to define baseline jib trim positions.

A. Take the horizontal strip of the tuning decal and adhere it to the boom along the outhaul line just immediately aft of the outhaul cleat.

B. Adjust the outhaul to roughly half-way between the max ease and max trim you would see. Using a marker or piece of tape, mark the outhaul line at the tuning decal’s number 5 mark. From here you can record settings as the outhaul is trimmed and eased, using the number 5 as your middle point.


A. Using the vertical strip of the tuning decal, adhere it to the mast along the jib halyard purchase. When doing this, set the jib halyard tension to medium and then place the decal so that the number five is right next to the top of the block.

B. Using the top of the block as your marker, you can now record and repeat heavy and light jib halyard trim settings.

This is the first episode in a new video series that teaches you how to use a Harken Blockheads Tuning Decal to create repeatable settings for your dinghy.
In this episode, John Pearce, US Sailing Youth Director, applies the tuning decal to an Opti to create a measurement system for raising and lowering the sprit halyard.
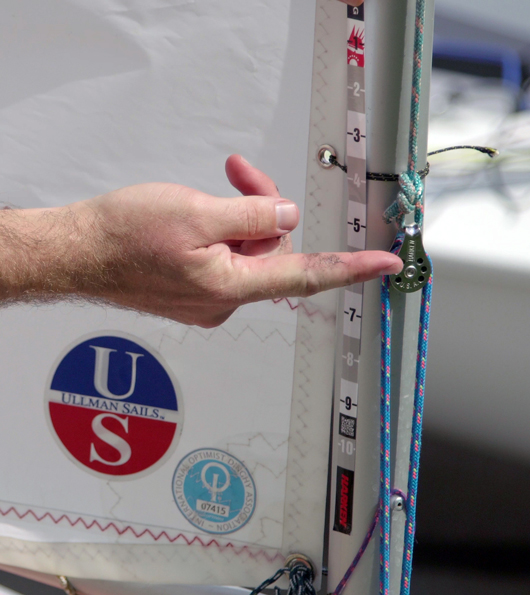
Place the tuning decal on the mast so that it sits in the middle of the range that the block will move.

In this example, when eased, the top of the knot sits right around the 3 inch marker.

In this example, when trimmed, the top of the knot sits right around the 5 inch marker.
Learn how to ease and tension your hiking strap to adapt to changing conditions quickly. Move just one knot and you can go from loose and a full hike, to tight and in-touch with the boat.
Bungee line is popular on dinghies for uses such as keeping hiking straps taught and tidying up lines. Installing bungee can be tough however, with knots often tightening too much or slipping out over time. Thankfully there is a great piece of hardware that is perfect for securing your bungee: a hog ring.
Hog rings are made of stainless steel and are designed to be pinched shut around whatever they are securing. Learn how to properly install your bungee line using a hog ring!
Learn how to finish a splice or tidy up the end of a line by tying a whipping. This video is a follow up to Making a 12-Strand Eye Splice. Whipping is an essential process for securing the tail of a splice and preventing any slippage over time. Watch and take note as Whitney Kent of Sheboygan Youth Sailing demonstrates this step-by-step process.
Splicing can often seem like a daunting skill to learn. When done well, it more closely resembles art than a functional rigging application. Everyone, however, needs to start somewhere, and the 12-strand eye splice is an easy first project to begin your splicing career with! Watch and take note as Whitney Kent of Sheboygan Youth Sailing demonstrates this step-by-step process.
Check back next week for our follow-up video on whipping, an essential process for securing the tail of the splice and preventing any slippage over time.
Check out this video for a few quick tips on upgrading your Opti boom vang.
The sprit halyard is one of the most important sail controls onboard an Opti. The more you can actively adjust the halyard tension to match conditions, the better your boat will sail. This is why it’s super important to have a low-friction system that’s easy to adjust while you’re sailing. Check out this video featuring Blockhead ambassadors Chapman and Jack as they install the key components to optimize Jack’s Opti sprit halyard.
Here is a list of the parts you will need for this project:


In search of awesome rigging upgrades for their Optis, Blockheads Jack Goggins and Chapman Petersen joined with professional rigger Olli Lubker for a trip to Harken World Headquarters one cold day in snowy Pewaukee, Wisconsin.
First on the list was upgrading Jack’s mainsheet to an interchangeable 4:1/3:1 “quick release” system. The goal of this system is to let you quickly switch from more to less purchase (or vice versa) without untying the line. It is one of the more popular upgrades in the Opti class and can be accomplished in several ways using a variety of parts and rigging methods. While we totally encourage you to experiment and find new ways to rig your boat, we’ve chosen to focus on this simple, effective method.
Watch the video for a step-by-step walk-through of the project. Here is a rundown of the key pieces of hardware you will need:

Harken 40mm Carbo Fiddle Block with Trigger Shackle
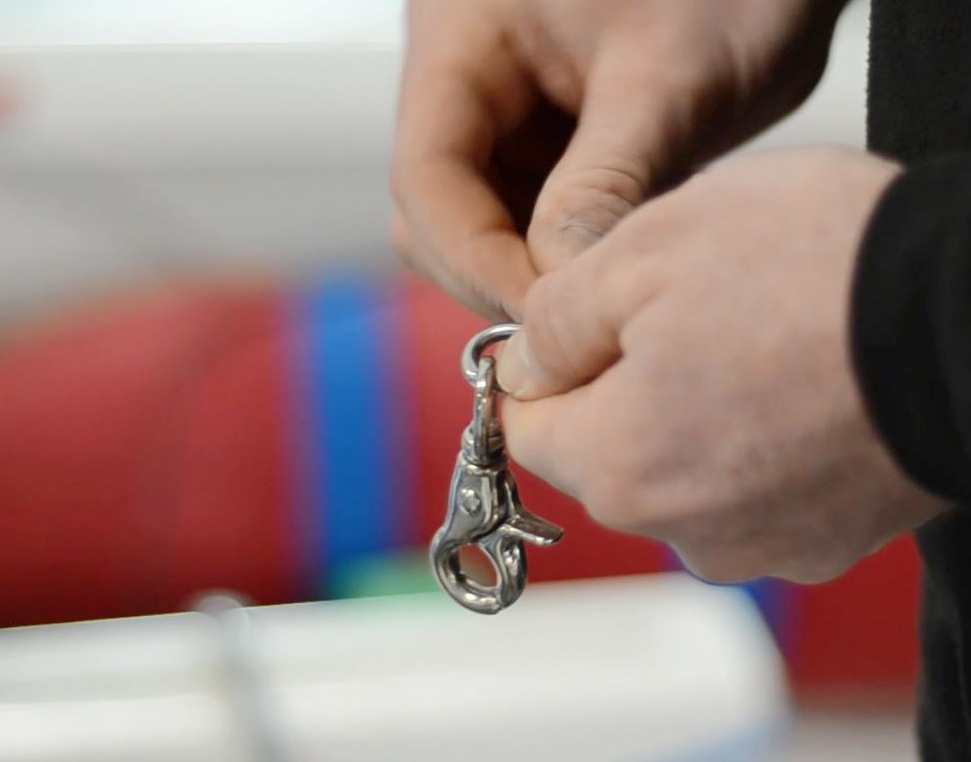
Trigger Schackle

In this video, Brian Swingly, Head Coach at the US Coast Guard Academy, John Pearce, former Head Coach at George Washington University and now Youth Director at US Sailing, and Krysta Rohde, the 2007 ICSA Singlehanded National Champion, offer a comprehensive walk through of many tips and tricks for rigging your Laser.
The more attention you can pay to these settings will put you closer in tune with the boat. It’s very important to know exactly how your boat moves and reacts in racing situations, and you can only know this with a ton of time and practice. Constantly be tweaking until you find the right balance. The sailor who puts in the most time rigging and tuning their boat will always have the extra edge!